Difference between revisions of "Canvas Layers"
| Line 10: | Line 10: | ||
| − | ==Layer List== | + | ===Layer List=== |
The main central area of the palette is the list of the layers contained in the current panel’s canvas. These layers are ordered with the uppermost layer first down to the lower most layer last. | The main central area of the palette is the list of the layers contained in the current panel’s canvas. These layers are ordered with the uppermost layer first down to the lower most layer last. | ||
| Line 35: | Line 35: | ||
| − | ===Stage Layer=== | + | ====Stage Layer==== |
All Panels have a special layer named ’Stage’, this layer shows the contents of the 3D [[Stage]] through the ‘Panel Camera’ at the last edited state. | All Panels have a special layer named ’Stage’, this layer shows the contents of the 3D [[Stage]] through the ‘Panel Camera’ at the last edited state. | ||
| Line 43: | Line 43: | ||
| − | ==Opacity Control== | + | ===Addition Controls=== |
| + | |||
| + | |||
| + | ====Opacity Control==== | ||
Above the main central layer list area is slider and value input to adjust the currently selected layer’s opacity. The opacity will be updated in realtime. | Above the main central layer list area is slider and value input to adjust the currently selected layer’s opacity. The opacity will be updated in realtime. | ||
| − | ==Add Layer Button== | + | ====Add Layer Button==== |
Clicking the add layer button will create a new blank layer. Dragging a layer to the add layer button will duplicate the layer. | Clicking the add layer button will create a new blank layer. Dragging a layer to the add layer button will duplicate the layer. | ||
| − | ==Remove Layer Button== | + | ====Remove Layer Button==== |
Clicking the remove layer button will delete the currently selected layer. | Clicking the remove layer button will delete the currently selected layer. | ||
| − | ==More Menu Button== | + | ====More Menu Button==== |
Clicking the More Menu button will display a popup menu with the following items: | Clicking the More Menu button will display a popup menu with the following items: | ||
Revision as of 19:11, 14 June 2017
More information about the ‘Layer’ element of a Panel’s Canvas can be found in the Canvas documentation.
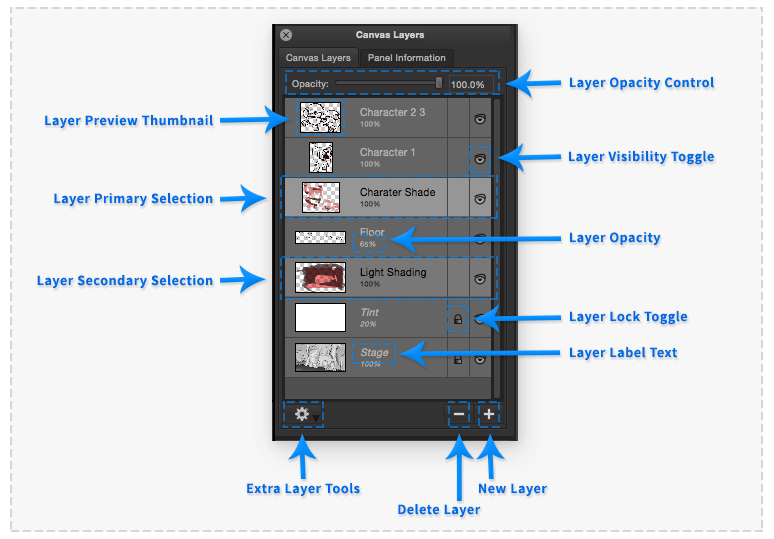
The ‘Canvas Layers’ palette provides the functionality to organise and adjust the image layers which are composited together to form the current Panel’s Canvas.
Layer List
The main central area of the palette is the list of the layers contained in the current panel’s canvas. These layers are ordered with the uppermost layer first down to the lower most layer last.
Each layer entry in the list comprises of a visibility checkbox, image thumbnail, layer name text and layer opacity text.
Clicking the visibility checkbox will change the visibility of the corresponding layer.
Double clicking the layer name text will allow the corresponding layer to be renamed using the displayed text edit field.
The current active layer that the current Canvas Tool will interact with is highlighted. The current active layer can be selected by clicking the mouse cursor on the corresponding layer in this list.
Multiple layers can also be selected using this list. By using the shift and control key modifiers and clicking the mouse cursor on layers in the list multiple layers will be selected.
Layers can be reordered in the list resulting in the Canvas layers being composited in a different order. To reorder the layers the selected layer(s) can be dragged with the mouse cursor to a different location in the list.
In addition layers can be dragged to Panels in the Panel Timeline and Panel Thumbnails palettes to copy a layer to another Panel Canvas.
It is also possible to drag and drop layers to the Assets palette, the layer will be added to the corresponding place in the asset library where dropped as a PNG image file with alpha transparency.
Stage Layer
All Panels have a special layer named ’Stage’, this layer shows the contents of the 3D Stage through the ‘Panel Camera’ at the last edited state.
The 'Stage' layer cannot be deleted and is always locked from being edited with Canvas Workspace. Although this layer can be reordered, hidden, duplicated and have its opacity adjusted.
Addition Controls
Opacity Control
Above the main central layer list area is slider and value input to adjust the currently selected layer’s opacity. The opacity will be updated in realtime.
Add Layer Button
Clicking the add layer button will create a new blank layer. Dragging a layer to the add layer button will duplicate the layer.
Remove Layer Button
Clicking the remove layer button will delete the currently selected layer.
More Menu Button
Clicking the More Menu button will display a popup menu with the following items:
- New Layer: Create a new blank layer above the primary selected layer.
- Duplicate Layer: Duplicate the currently selected layer(s).
- Delete Layer: Delete the currently selected layer(s).
- Delete Hidden Layers: Delete all layers in the Canvas that have their visibility option deactivated (excluding the ’Stage’ layer).
- Merge Down: Merge the currently selected layer with the layer below in the above list of layers.
- Merge Visible: Merge all the layers in the Canvas with their visibility option activated (excluding the ’Stage’ layer).
- Flatten Image: Merge all the layers in the Canvas that are visible and deletes any layers with their visibility option deactivated (excluding the ’Stage’ layer).
