Maya Tools: Difference between revisions
No edit summary |
No edit summary |
||
| (10 intermediate revisions by the same user not shown) | |||
| Line 1: | Line 1: | ||
__NOTOC__ | __NOTOC__ | ||
<span style="color:#ff0000">'''This page was originally made for PanelForge Studio version 1.x. Some minor details may have changed when referring to later versions of PanelForge.'''</span> | |||
Multiple powerful tools for integration with 'Autodesk Maya' are included with PanelForge. These tools provide the functionality to seamlessly incorporate PanelForge into an existing Maya centric pipeline. | |||
===Accessing the PanelForge Maya Tools=== | |||
These tools can be easily accessed via the 'Show Maya Tools in Windows Explorer…' menu item located in the 'Help' main menu of PanelForge. | These tools can be easily accessed via the 'Show Maya Tools in Windows Explorer…' menu item located in the 'Help' main menu of PanelForge. | ||
| Line 15: | Line 21: | ||
===Exporting to Maya=== | ===Exporting to Maya=== | ||
The tools provided with PanelForge Studio provide functionality to quickly transfer a sequence of Panel Stage layouts to Maya as an animated sequence. This powerful process automatically creates an exact replica of the PanelForge Stage object layout including PanelForge Canvas drawn data as a Camera overlays. | The tools provided with PanelForge Studio provide the functionality to quickly transfer a sequence of Panel Stage layouts to Maya as an animated sequence. This powerful process automatically creates an exact replica of the PanelForge Stage object layout including PanelForge Canvas drawn data as a Camera overlays. | ||
The following data transfer is | The following data transfer is currently supported by the included PanelForge Maya import tools: | ||
* Stage Camera including look at point, focal length and aperture ratio, etc. | * Stage Camera including 'look at point', 'focal length' and 'aperture ratio', etc. | ||
* Stage Geometry imported as Maya references. | * Stage Geometry imported as Maya references. | ||
* Stage Grouping, Hierarchies and Locators. | * Stage Grouping, Hierarchies and Locators. | ||
| Line 27: | Line 33: | ||
* Export and Import of geometry object substitution setup with CSV lookup files. | * Export and Import of geometry object substitution setup with CSV lookup files. | ||
In addition the Maya import tool is provided with full Python source code including the PySide (Qt) interface. If required experienced Maya users or Animation studios can use this to quickly expand and/or integrated into other pipeline tools and asset management systems if required. | In addition, the Maya import tool is provided with full Python source code including the PySide (Qt) interface. If required experienced Maya users or Animation studios can use this to quickly expand and/or integrated into other pipeline tools and asset management systems if required. | ||
To permit this flexibility an intermediate Project XML file is first exported from PanelForge. This process is described in the following step by step guide: | To permit this flexibility an intermediate Project XML file is first exported from PanelForge. This process is described in the following step by step guide: | ||
| Line 34: | Line 40: | ||
====1) PanelForge Project XML file Export.==== | ====1) PanelForge Project XML file Export.==== | ||
First open the PanelForge Project to be exported in PanelForge Studio. Display the 'Export Panels' window by selecting the 'Export…' menu item from the main PanelForge 'File' menu. | First, open the PanelForge Project to be exported in PanelForge Studio. Display the 'Export Panels' window by selecting the 'Export…' menu item from the main PanelForge 'File' menu. | ||
Detailed information about the functionality of the 'Export Panels' window is available at the Exporting documentation page. | Detailed information about the functionality of the 'Export Panels' window is available at the Exporting documentation page. | ||
| Line 54: | Line 60: | ||
The PanelForge Maya tools are provided in two parts. The first is a Python script that includes the features to import a PanelForge Project XML file into Maya. The second is a Maya Plugin with import and export file format support for the PanelForge optimized PFE geometry file format. | The PanelForge Maya tools are provided in two parts. The first is a Python script that includes the features to import a PanelForge Project XML file into Maya. The second is a Maya Plugin with import and export file format support for the PanelForge optimized PFE geometry file format. | ||
The simplest way to load the PanelForge Maya Python script Tools is to paste the following line into the Maya Python Command Line field. The default | The simplest way to load the PanelForge Maya Python script Tools is to paste the following line into the Maya Python Command Line field. The default install location of this file is following: | ||
:[[File: Maya03.png|thumb|500px|none|]] | :[[File: Maya03.png|thumb|500px|none|]] | ||
'''PanelForge Studio | '''PanelForge Studio Version 3.0:''' | ||
execfile('C:\Program Files\ | execfile('C:\Program Files\PanelForgeStudio3\MayaTools\panelForgeMayaTools.py') | ||
| Line 75: | Line 77: | ||
When the PanelForge Maya Python script is loaded the 'PanelForge' main menu will be added to Maya. The last item in the Maya PanelForge menu will indicate if the PanelForge Maya Plugin has also been loaded correctly: | When the PanelForge Maya Python script is loaded the 'PanelForge' main menu will be added to Maya. The last item in the Maya PanelForge menu will indicate if the PanelForge Maya Plugin has also been loaded correctly: | ||
:[[File: Maya04.png|thumb| | :[[File: Maya04.png|thumb|300px|none|]] | ||
| Line 82: | Line 84: | ||
To import a PanelForge Project XML Select the 'Panels from Project XML file…' item in the 'Import' submenu of the main 'PanelForge' menu in Maya. | To import a PanelForge Project XML Select the 'Panels from Project XML file…' item in the 'Import' submenu of the main 'PanelForge' menu in Maya. | ||
:[[File: Maya25.PNG|thumb| | :[[File: Maya25.PNG|thumb|500px|none|]] | ||
A file dialog window will be displayed to select the desired PanelForge Project XML file to import. | A file dialog window will be displayed to select the desired PanelForge Project XML file to import. | ||
:[[File: Maya26.PNG|thumb| | :[[File: Maya26.PNG|thumb|500px|none|]] | ||
After the PanelForge Project XML file has been loaded the complete range of Panels is drag selected in the 'Select Panels' dialog window. | After the PanelForge Project XML file has been loaded the complete range of Panels is drag selected in the 'Select Panels' dialog window. | ||
:[[File: Maya27.PNG|thumb| | :[[File: Maya27.PNG|thumb|400px|none|]] | ||
The 'Import Mode' is kept to the default 'Animated Sequence' value. This will create a minimal set of referenced Maya geometry and Cameras that will be animated based on Object placement in the PanelForge Panel Stages. | The 'Import Mode' is kept to the default 'Animated Sequence' value. This will create a minimal set of referenced Maya geometry and Cameras that will be animated based on Object placement in the PanelForge Panel Stages. | ||
Alternately 'Group Per Panel' can be selected which will create a separate group containing the contents of each PanelForge Panel Stages (this option is only recommended for a small | Alternately 'Group Per Panel' can be selected which will create a separate group containing the contents of each PanelForge Panel Stages (this option is only recommended for a small number of Panels). | ||
The 'New Scene' checkbox will clear the current Maya scene before the Import process is performed. | The 'New Scene' checkbox will clear the current Maya scene before the Import process is performed. | ||
| Line 100: | Line 102: | ||
====4) Adjust PanelForge Asset Library locations.==== | ====4) Adjust PanelForge Asset Library locations.==== | ||
When a PanelForge 'Asset Library' is not found the 'Manage Asset Libraries' window will be displayed. | |||
This window replicates the corresponding window used in the PanelForge application. | |||
:[[File: Maya05.png|thumb| | Missing Asset Libraries will be displayed in red. Asset Library locations can be corrected by selecting the corresponding Library in the list and clicking the 'Edit Path' button. | ||
:[[File: Maya05.png|thumb|600px|none|]] | |||
The 'Manage Asset Libraries window can also be later shown by clicking the 'Asset Library Manager' button in the 'Manage Asset Linkage' window. | The 'Manage Asset Libraries window can also be later shown by clicking the 'Asset Library Manager' button in the 'Manage Asset Linkage' window. | ||
| Line 109: | Line 114: | ||
====5) Substituting imported geometry files.==== | ====5) Substituting imported geometry files.==== | ||
Next, the 'Manage Asset Linkage' window is displayed. This window shows a list of all geometry file assets that will be imported. | |||
When an asset can be found on disk will be displayed as green in the list, otherwise red if the location is not valid. | |||
:[[File: Maya28.PNG|thumb|600px|none|]] | |||
This window allows the optional easy substitution of a PanelForge asset with a Maya scene file. | |||
By pressing the file button to the far right of an asset in the list a file section window will be displayed. The selected file will replace the original asset file during import. | |||
A substitution setup can be exported to a CSV file with the 'Export CSV File' button. | |||
Such a CSV file can be also manually adjusted with a text/spreadsheet editing application (such as Microsoft Excel). | |||
CSV substitution setup files can be imported and applied using the 'Import CSV File' button. | |||
| Line 126: | Line 137: | ||
After the import with the 'Animated Sequence' option selected the Maya viewport camera will not be updated correctly until the timeline location is changed. | After the import with the 'Animated Sequence' option selected the Maya viewport camera will not be updated correctly until the timeline location is changed. | ||
If the 'Group Per Panel' option was selected | If the 'Group Per Panel' option was selected then a new camera for each Panel will be created. The Maya viewport will need to be set to display using the desired Panel group's camera. | ||
:[[File: Maya29.PNG|thumb| | :[[File: Maya29.PNG|thumb|600px|none|]] | ||
If required the Maya Reference editor can be used to convert the imported geometry Maya References to imported scene geometry. | If required the Maya Reference editor can be used to convert the imported geometry Maya References to imported scene geometry. | ||
| Line 135: | Line 146: | ||
===Importing Geometry from Maya=== | ===Importing Geometry from Maya=== | ||
PanelForge supports generic 'OBJ' and '3DS' geometry formats. For optimal performance it is recommended to use the PanelForge 'PFE' geometry format. | PanelForge supports generic 'OBJ' and '3DS' geometry formats. For optimal performance, it is recommended to use the PanelForge 'PFE' geometry format. | ||
PanelForge Provides a Maya Plugin with 'PFE' format open/save/import/export integration. After loading the PanelForge Maya Plugin the 'PFE' format will be available as a file format in Maya's file dialog windows. | PanelForge Provides a Maya Plugin with 'PFE' format open/save/import/export integration. After loading the PanelForge Maya Plugin the 'PFE' format will be available as a file format in Maya's file dialog windows. | ||
:[[File: Maya06.png|thumb| | :[[File: Maya06.png|thumb|500px|none|]] | ||
Using the PanelForge Python Script the 'Export Selected Geometry as PFE File Hierarchy…' option in the main 'PanelForge' Maya menu will be available. This feature will automatically export a Hierarchy of mesh objects in Maya to the corresponding file structure on disk. This directory file structure can then be imported into PanelForge. | Using the PanelForge Python Script the 'Export Selected Geometry as PFE File Hierarchy…' option in the main 'PanelForge' Maya menu will be available. This feature will automatically export a Hierarchy of mesh objects in Maya to the corresponding file structure on disk. This directory file structure can then be imported into PanelForge. | ||
Latest revision as of 13:38, 8 April 2022
This page was originally made for PanelForge Studio version 1.x. Some minor details may have changed when referring to later versions of PanelForge.
Multiple powerful tools for integration with 'Autodesk Maya' are included with PanelForge. These tools provide the functionality to seamlessly incorporate PanelForge into an existing Maya centric pipeline.
Accessing the PanelForge Maya Tools
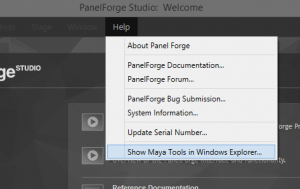
These tools can be easily accessed via the 'Show Maya Tools in Windows Explorer…' menu item located in the 'Help' main menu of PanelForge.
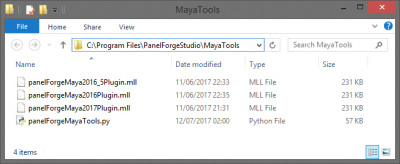
This menu item will reveal the PanelForge Maya tool files in the Windows Explorer.
Exporting to Maya
The tools provided with PanelForge Studio provide the functionality to quickly transfer a sequence of Panel Stage layouts to Maya as an animated sequence. This powerful process automatically creates an exact replica of the PanelForge Stage object layout including PanelForge Canvas drawn data as a Camera overlays.
The following data transfer is currently supported by the included PanelForge Maya import tools:
- Stage Camera including 'look at point', 'focal length' and 'aperture ratio', etc.
- Stage Geometry imported as Maya references.
- Stage Grouping, Hierarchies and Locators.
- Keyed animation of Stage object/cameras transforms and visibility between Panels.
- Adjustment and locating of PanelForge Asset Libraries.
- Substitution of geometry objects with custom geometry files.
- Export and Import of geometry object substitution setup with CSV lookup files.
In addition, the Maya import tool is provided with full Python source code including the PySide (Qt) interface. If required experienced Maya users or Animation studios can use this to quickly expand and/or integrated into other pipeline tools and asset management systems if required.
To permit this flexibility an intermediate Project XML file is first exported from PanelForge. This process is described in the following step by step guide:
1) PanelForge Project XML file Export.
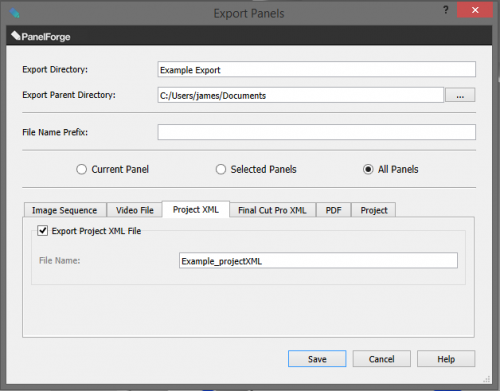
First, open the PanelForge Project to be exported in PanelForge Studio. Display the 'Export Panels' window by selecting the 'Export…' menu item from the main PanelForge 'File' menu.
Detailed information about the functionality of the 'Export Panels' window is available at the Exporting documentation page.
To export the data required for the Maya import check the 'Export Project XML file' checkbox in the 'Project XML' settings tab.
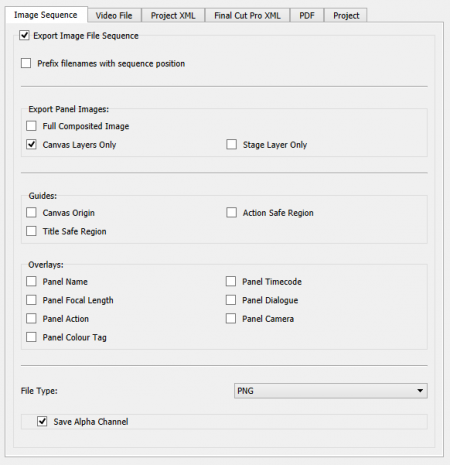
Optionally Canvas drawings can be displayed as Camera overlays in the Maya import. To export this image data check the 'Export Image File Sequence' checkbox and the 'Canvas Layers Only' checkbox in the 'Image Sequence' settings tab. The default 'png' File Type setting with 'Save Alpha Channel' should be retained.
If these exported image files are present in the same directory as the Project XML file being imported into Maya then they will be automatically used.
2) Loading the PanelForge Maya Tools.
The PanelForge Maya tools are provided in two parts. The first is a Python script that includes the features to import a PanelForge Project XML file into Maya. The second is a Maya Plugin with import and export file format support for the PanelForge optimized PFE geometry file format.
The simplest way to load the PanelForge Maya Python script Tools is to paste the following line into the Maya Python Command Line field. The default install location of this file is following:
PanelForge Studio Version 3.0:
execfile('C:\Program Files\PanelForgeStudio3\MayaTools\panelForgeMayaTools.py')
If 'MEL' is set as the Command line input it can be switched to 'Python' by clicking on the 'MEL' text.
The PanelForge Maya script will also load the PanelForge Maya Plugin automatically if present in the PanelForge Installed location.
When the PanelForge Maya Python script is loaded the 'PanelForge' main menu will be added to Maya. The last item in the Maya PanelForge menu will indicate if the PanelForge Maya Plugin has also been loaded correctly:
3) Import PanelForge Project XML file.
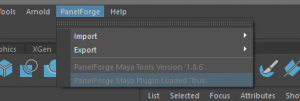
To import a PanelForge Project XML Select the 'Panels from Project XML file…' item in the 'Import' submenu of the main 'PanelForge' menu in Maya.
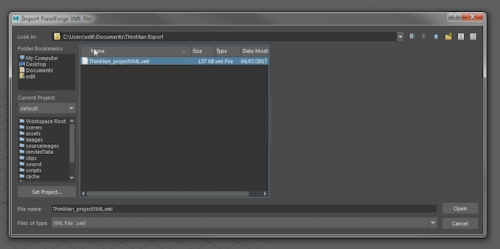
A file dialog window will be displayed to select the desired PanelForge Project XML file to import.
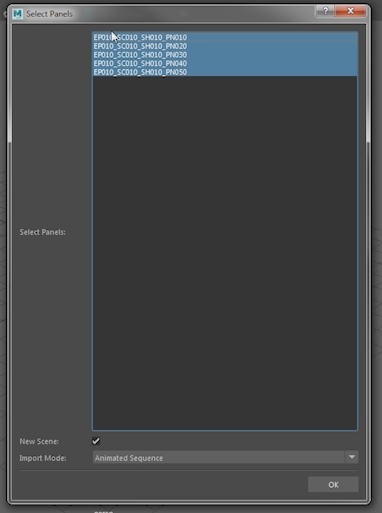
After the PanelForge Project XML file has been loaded the complete range of Panels is drag selected in the 'Select Panels' dialog window.
The 'Import Mode' is kept to the default 'Animated Sequence' value. This will create a minimal set of referenced Maya geometry and Cameras that will be animated based on Object placement in the PanelForge Panel Stages.
Alternately 'Group Per Panel' can be selected which will create a separate group containing the contents of each PanelForge Panel Stages (this option is only recommended for a small number of Panels). The 'New Scene' checkbox will clear the current Maya scene before the Import process is performed.
4) Adjust PanelForge Asset Library locations.
When a PanelForge 'Asset Library' is not found the 'Manage Asset Libraries' window will be displayed. This window replicates the corresponding window used in the PanelForge application.
Missing Asset Libraries will be displayed in red. Asset Library locations can be corrected by selecting the corresponding Library in the list and clicking the 'Edit Path' button.
The 'Manage Asset Libraries window can also be later shown by clicking the 'Asset Library Manager' button in the 'Manage Asset Linkage' window.
5) Substituting imported geometry files.
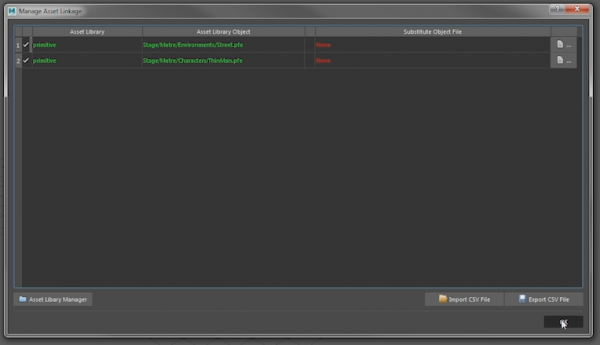
Next, the 'Manage Asset Linkage' window is displayed. This window shows a list of all geometry file assets that will be imported.
When an asset can be found on disk will be displayed as green in the list, otherwise red if the location is not valid.
This window allows the optional easy substitution of a PanelForge asset with a Maya scene file. By pressing the file button to the far right of an asset in the list a file section window will be displayed. The selected file will replace the original asset file during import.
A substitution setup can be exported to a CSV file with the 'Export CSV File' button.
Such a CSV file can be also manually adjusted with a text/spreadsheet editing application (such as Microsoft Excel).
CSV substitution setup files can be imported and applied using the 'Import CSV File' button.
Clicking the 'OK' button will now perform the PanelForge Project XML import scene generation.
6) Exploring the imported data.
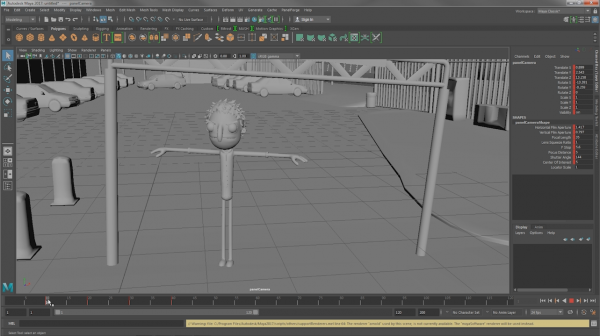
After the import with the 'Animated Sequence' option selected the Maya viewport camera will not be updated correctly until the timeline location is changed.
If the 'Group Per Panel' option was selected then a new camera for each Panel will be created. The Maya viewport will need to be set to display using the desired Panel group's camera.
If required the Maya Reference editor can be used to convert the imported geometry Maya References to imported scene geometry.
Importing Geometry from Maya
PanelForge supports generic 'OBJ' and '3DS' geometry formats. For optimal performance, it is recommended to use the PanelForge 'PFE' geometry format.
PanelForge Provides a Maya Plugin with 'PFE' format open/save/import/export integration. After loading the PanelForge Maya Plugin the 'PFE' format will be available as a file format in Maya's file dialog windows.
Using the PanelForge Python Script the 'Export Selected Geometry as PFE File Hierarchy…' option in the main 'PanelForge' Maya menu will be available. This feature will automatically export a Hierarchy of mesh objects in Maya to the corresponding file structure on disk. This directory file structure can then be imported into PanelForge.
It is highly recommended to merge any separate mesh objects to a single mesh in Maya before export to a PFE geometry file for optimal display performance in PanelForge.
