Difference between revisions of "Canvas Tools"
| Line 1: | Line 1: | ||
| + | __NOTOC__ | ||
| + | |||
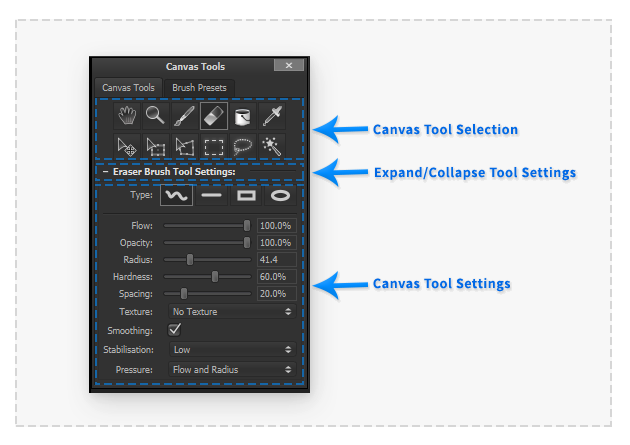
The 'Canvas Tools' palette provides the ability to select the current interactive tool active in the canvas workspace. The palette also makes available all the available settings to currently active canvas workspace tool. | The 'Canvas Tools' palette provides the ability to select the current interactive tool active in the canvas workspace. The palette also makes available all the available settings to currently active canvas workspace tool. | ||
| − | :[[File: | + | |
| + | :[[File: CanvasToolsComp.png|thumb| 630px |none|]] | ||
| + | |||
To set the active canvas workspace select the corresponding tool icon button. The active canvas tool settings can be displayed or hidden by clicking the active canvas tool settings label below the canvas tool icon buttons. | To set the active canvas workspace select the corresponding tool icon button. The active canvas tool settings can be displayed or hidden by clicking the active canvas tool settings label below the canvas tool icon buttons. | ||
| Line 13: | Line 17: | ||
The hand tool provides ways to interactively navigate the canvas view. | The hand tool provides ways to interactively navigate the canvas view. | ||
| + | |||
==Pan Canvas== | ==Pan Canvas== | ||
| Line 24: | Line 29: | ||
The zoom tool provides ways to interactively zoom the canvas view. | The zoom tool provides ways to interactively zoom the canvas view. | ||
| + | |||
==Drag Zoom== | ==Drag Zoom== | ||
| Line 35: | Line 41: | ||
The paint brush tool provides an interactive tool to manipulate the pixel colours of areas of the current canvas layer. Circular stamps of the current tool colour will be produced at regular intervals on the current canvas layer based on the following settings: | The paint brush tool provides an interactive tool to manipulate the pixel colours of areas of the current canvas layer. Circular stamps of the current tool colour will be produced at regular intervals on the current canvas layer based on the following settings: | ||
| + | |||
==Type== | ==Type== | ||
Four brush types are provides that produce different results when using the mouse to interact with the canvas view. | Four brush types are provides that produce different results when using the mouse to interact with the canvas view. | ||
| + | |||
===Freeform=== | ===Freeform=== | ||
Clicking and dragging the mouse cursor in the canvas view will produce brush stamps under the mouse cursor at regular intervals as it is moved. | Clicking and dragging the mouse cursor in the canvas view will produce brush stamps under the mouse cursor at regular intervals as it is moved. | ||
| + | |||
===Line=== | ===Line=== | ||
Clicking and dragging the mouse cursor between two points in the canvas view will produce a line comprising of brush stamps at regular intervals. A dashed line is provided during tool interaction to indicate where the output stamps will be produced. Holding the Shift key during tool interaction will snap the produced line to Horizontal or Vertical orientation. | Clicking and dragging the mouse cursor between two points in the canvas view will produce a line comprising of brush stamps at regular intervals. A dashed line is provided during tool interaction to indicate where the output stamps will be produced. Holding the Shift key during tool interaction will snap the produced line to Horizontal or Vertical orientation. | ||
| + | |||
===Rectangle=== | ===Rectangle=== | ||
Clicking and dragging the mouse cursor between two points in the canvas view will produce a rectangle comprising of brush stamps at regular intervals. A dashed line is provided during tool interaction to indicate where the output stamps will be produced. Holding the Shift key during tool interaction will snap the produced rectangle to be a square. | Clicking and dragging the mouse cursor between two points in the canvas view will produce a rectangle comprising of brush stamps at regular intervals. A dashed line is provided during tool interaction to indicate where the output stamps will be produced. Holding the Shift key during tool interaction will snap the produced rectangle to be a square. | ||
| + | |||
===Oval=== | ===Oval=== | ||
Clicking and dragging the mouse cursor between two points in the canvas view will produce an oval comprising of brush stamps at regular intervals. A dashed line is provided during tool interaction to indicate where the output stamps will be produced. Holding the Shift key during tool interaction will snap the produced rectangle to be a circle. | Clicking and dragging the mouse cursor between two points in the canvas view will produce an oval comprising of brush stamps at regular intervals. A dashed line is provided during tool interaction to indicate where the output stamps will be produced. Holding the Shift key during tool interaction will snap the produced rectangle to be a circle. | ||
| + | |||
==Flow== | ==Flow== | ||
The flow level controls the transparency of each individual brush stamps. A flow level of 100% will provide a strong brush stroke, a lower flow level will provide a more natural fluid brush stroke. | The flow level controls the transparency of each individual brush stamps. A flow level of 100% will provide a strong brush stroke, a lower flow level will provide a more natural fluid brush stroke. | ||
| + | |||
==Opacity== | ==Opacity== | ||
The opacity level controls transparency of the complete brush stroke. A opacity level lower than 100% provides maximum strength of the brush stroke, a lower opacity will not allow any element of a brush stoke to be above the specified opacity even if the same area is interacted with multiple times. | The opacity level controls transparency of the complete brush stroke. A opacity level lower than 100% provides maximum strength of the brush stroke, a lower opacity will not allow any element of a brush stoke to be above the specified opacity even if the same area is interacted with multiple times. | ||
| + | |||
==Radius== | ==Radius== | ||
The radius control specifies the maximum radius of brush stamps in pixels. If a pressure sensitive input device is used and pressure sensitivity settings are active then the radius of brush stamps may be smaller than this specified radius. | The radius control specifies the maximum radius of brush stamps in pixels. If a pressure sensitive input device is used and pressure sensitivity settings are active then the radius of brush stamps may be smaller than this specified radius. | ||
| + | |||
==Hardness== | ==Hardness== | ||
The hardness level controls the amount a brush stamp fades around it's edge. A hardness of 100% will mean no edge fading with happen. 0% hardness will produce a brush stamps opacity to fade from the completly way from centre to edge. | The hardness level controls the amount a brush stamp fades around it's edge. A hardness of 100% will mean no edge fading with happen. 0% hardness will produce a brush stamps opacity to fade from the completly way from centre to edge. | ||
| + | |||
==Spacing== | ==Spacing== | ||
The spacing level control specifies the spacing between brush stamps based on a brush stamps current radius. A level of 100% will cause no brush stamp overlapping, where as a low spacing level will cause brush to overlap more tightly. | The spacing level control specifies the spacing between brush stamps based on a brush stamps current radius. A level of 100% will cause no brush stamp overlapping, where as a low spacing level will cause brush to overlap more tightly. | ||
| + | |||
==Smoothing== | ==Smoothing== | ||
| Line 81: | Line 98: | ||
Under normal operation this option is recommended to be active. | Under normal operation this option is recommended to be active. | ||
| + | |||
==Pressure== | ==Pressure== | ||
If a pressure sensitive input device is being used such as a Wacom graphics tablet then these options allow the input pressure is dynamically affect the brush tool output. The following options are available: | If a pressure sensitive input device is being used such as a Wacom graphics tablet then these options allow the input pressure is dynamically affect the brush tool output. The following options are available: | ||
| + | |||
===Disabled=== | ===Disabled=== | ||
Even if a pressure sensitive input device is available the pressure input will be ignored. | Even if a pressure sensitive input device is available the pressure input will be ignored. | ||
| + | |||
===Flow=== | ===Flow=== | ||
The amount of pressure input is multiplies brush flow amount. The result is updated as each brush stamp is produced. | The amount of pressure input is multiplies brush flow amount. The result is updated as each brush stamp is produced. | ||
| + | |||
===Radius=== | ===Radius=== | ||
The amount of pressure input is multiplies brush radius amount. The result is updated as each brush stamp is produced. | The amount of pressure input is multiplies brush radius amount. The result is updated as each brush stamp is produced. | ||
| + | |||
===Flow and Radius=== | ===Flow and Radius=== | ||
Both the flow and radius amounts of the brush are both modified as specified above. | Both the flow and radius amounts of the brush are both modified as specified above. | ||
| + | |||
==Behind== | ==Behind== | ||
| Line 112: | Line 135: | ||
The eraser brush tool provides an interactive tool to manipulate the pixel transparency of areas of the current canvas layer. Circular stamps of reduced opacity will be produced at regular intervals on the current canvas layer based on the following settings: | The eraser brush tool provides an interactive tool to manipulate the pixel transparency of areas of the current canvas layer. Circular stamps of reduced opacity will be produced at regular intervals on the current canvas layer based on the following settings: | ||
| + | |||
==Type== | ==Type== | ||
Four brush types are provides that produce different results when using the mouse to interact with the canvas view. | Four brush types are provides that produce different results when using the mouse to interact with the canvas view. | ||
| + | |||
===Freeform=== | ===Freeform=== | ||
Clicking and dragging the mouse cursor in the canvas view will produce brush stamps under the mouse cursor at regular intervals as it is moved. | Clicking and dragging the mouse cursor in the canvas view will produce brush stamps under the mouse cursor at regular intervals as it is moved. | ||
| + | |||
===Line=== | ===Line=== | ||
Clicking and dragging the mouse cursor between two points in the canvas view will produce a line comprising of brush stamps at regular intervals. A dashed line is provided during tool interaction to indicate where the output stamps will be produced. Holding the Shift key during tool interaction will snap the produced line to Horizontal or Vertical orientation. | Clicking and dragging the mouse cursor between two points in the canvas view will produce a line comprising of brush stamps at regular intervals. A dashed line is provided during tool interaction to indicate where the output stamps will be produced. Holding the Shift key during tool interaction will snap the produced line to Horizontal or Vertical orientation. | ||
| + | |||
===Rectangle=== | ===Rectangle=== | ||
Clicking and dragging the mouse cursor between two points in the canvas view will produce a rectangle comprising of brush stamps at regular intervals. A dashed line is provided during tool interaction to indicate where the output stamps will be produced. Holding the Shift key during tool interaction will snap the produced rectangle to be a square. | Clicking and dragging the mouse cursor between two points in the canvas view will produce a rectangle comprising of brush stamps at regular intervals. A dashed line is provided during tool interaction to indicate where the output stamps will be produced. Holding the Shift key during tool interaction will snap the produced rectangle to be a square. | ||
| + | |||
===Oval=== | ===Oval=== | ||
Clicking and dragging the mouse cursor between two points in the canvas view will produce an oval comprising of brush stamps at regular intervals. A dashed line is provided during tool interaction to indicate where the output stamps will be produced. Holding the Shift key during tool interaction will snap the produced rectangle to be a circle. | Clicking and dragging the mouse cursor between two points in the canvas view will produce an oval comprising of brush stamps at regular intervals. A dashed line is provided during tool interaction to indicate where the output stamps will be produced. Holding the Shift key during tool interaction will snap the produced rectangle to be a circle. | ||
| + | |||
==Flow== | ==Flow== | ||
The flow level controls the transparency of each individual brush stamps. A flow level of 100% will provide a strong brush stroke, a lower flow level will provide a more natural fluid brush stroke. | The flow level controls the transparency of each individual brush stamps. A flow level of 100% will provide a strong brush stroke, a lower flow level will provide a more natural fluid brush stroke. | ||
| + | |||
==Opacity== | ==Opacity== | ||
The opacity level controls transparency of the complete brush stroke. A opacity level lower than 100% provides maximum strength of the brush stroke, a lower opacity will not allow any element of a brush stoke to be above the specified opacity even if the same area is interacted with multiple times. | The opacity level controls transparency of the complete brush stroke. A opacity level lower than 100% provides maximum strength of the brush stroke, a lower opacity will not allow any element of a brush stoke to be above the specified opacity even if the same area is interacted with multiple times. | ||
| + | |||
==Radius== | ==Radius== | ||
The radius control specifies the maximum radius of brush stamps in pixels. If a pressure sensitive input device is used and pressure sensitivity settings are active then the radius of brush stamps may be smaller than this specified radius. | The radius control specifies the maximum radius of brush stamps in pixels. If a pressure sensitive input device is used and pressure sensitivity settings are active then the radius of brush stamps may be smaller than this specified radius. | ||
| + | |||
==Hardness== | ==Hardness== | ||
The hardness level controls the amount a brush stamp fades around it's edge. A hardness of 100% will mean no edge fading with happen. 0% hardness will produce a brush stamps opacity to fade from the completly way from centre to edge. | The hardness level controls the amount a brush stamp fades around it's edge. A hardness of 100% will mean no edge fading with happen. 0% hardness will produce a brush stamps opacity to fade from the completly way from centre to edge. | ||
| + | |||
==Spacing== | ==Spacing== | ||
The spacing level control specifies the spacing between brush stamps based on a brush stamps current radius. A level of 100% will cause no brush stamp overlapping, where as a low spacing level will cause brush to overlap more tightly. | The spacing level control specifies the spacing between brush stamps based on a brush stamps current radius. A level of 100% will cause no brush stamp overlapping, where as a low spacing level will cause brush to overlap more tightly. | ||
| + | |||
==Smoothing== | ==Smoothing== | ||
| Line 158: | Line 192: | ||
Under normal operation this option is recommended to be active. | Under normal operation this option is recommended to be active. | ||
| + | |||
==Pressure== | ==Pressure== | ||
If a pressure sensitive input device is being used such as a Wacom graphics tablet then these options allow the input pressure is dynamically affect the brush tool output. The following options are available: | If a pressure sensitive input device is being used such as a Wacom graphics tablet then these options allow the input pressure is dynamically affect the brush tool output. The following options are available: | ||
| + | |||
===Disabled=== | ===Disabled=== | ||
Even if a pressure sensitive input device is available the pressure input will be ignored. | Even if a pressure sensitive input device is available the pressure input will be ignored. | ||
| + | |||
===Flow=== | ===Flow=== | ||
The amount of pressure input is multiplies brush flow amount. The result is updated as each brush stamp is produced. | The amount of pressure input is multiplies brush flow amount. The result is updated as each brush stamp is produced. | ||
| + | |||
===Radius=== | ===Radius=== | ||
The amount of pressure input is multiplies brush radius amount. The result is updated as each brush stamp is produced. | The amount of pressure input is multiplies brush radius amount. The result is updated as each brush stamp is produced. | ||
| + | |||
===Flow and Radius=== | ===Flow and Radius=== | ||
| Line 185: | Line 224: | ||
The fill bucket tool will flood areas of the current canvas layer of similar colours with the current canvas tool colour radiating from a selected seed point. The seed point of the colour fill is specified by clicking the mouse cursor on a point of the canvas view. The result of this tool can be controlled using the following settings: | The fill bucket tool will flood areas of the current canvas layer of similar colours with the current canvas tool colour radiating from a selected seed point. The seed point of the colour fill is specified by clicking the mouse cursor on a point of the canvas view. The result of this tool can be controlled using the following settings: | ||
| + | |||
==Tolerance== | ==Tolerance== | ||
The percentage level that controls the level of difference from the point selected on the current canvas layer that will be flooded with the tool. A value of 100% will flood all pixels in the current layer regardless of their difference from the seed point colour. A value of 0% will only allow pixels of the exact same value of the seed point to be flooded. | The percentage level that controls the level of difference from the point selected on the current canvas layer that will be flooded with the tool. A value of 100% will flood all pixels in the current layer regardless of their difference from the seed point colour. A value of 0% will only allow pixels of the exact same value of the seed point to be flooded. | ||
| + | |||
==Restrict to Canvas== | ==Restrict to Canvas== | ||
When selected the area that can be flooded by the fill bucket tool will be restricted to the canvas area. | When selected the area that can be flooded by the fill bucket tool will be restricted to the canvas area. | ||
| + | |||
==Restrict to Range== | ==Restrict to Range== | ||
| Line 204: | Line 246: | ||
The eyedropper tool allows the user to select an existing colour in the current canvas view by clicking the mouse cursor to become the current canvas colour tool colour. How this colour is determined can be controlled using the following settings: | The eyedropper tool allows the user to select an existing colour in the current canvas view by clicking the mouse cursor to become the current canvas colour tool colour. How this colour is determined can be controlled using the following settings: | ||
| + | |||
==Sample All Visible Layers== | ==Sample All Visible Layers== | ||
| Line 217: | Line 260: | ||
When the shift key is held down during tool interaction movement will be constrained to horizontal and vertical movement. | When the shift key is held down during tool interaction movement will be constrained to horizontal and vertical movement. | ||
| + | |||
==Show Boundary== | ==Show Boundary== | ||
| Line 240: | Line 284: | ||
* Double click mouse cursor in the transform area bounding box. | * Double click mouse cursor in the transform area bounding box. | ||
* Switch to another canvas tool or perform another operation in PanelForge (a confirmation dialog box will be displayed to confirm the transform). | * Switch to another canvas tool or perform another operation in PanelForge (a confirmation dialog box will be displayed to confirm the transform). | ||
| + | |||
==Flip Horizontal== | ==Flip Horizontal== | ||
This button will add a horizontal flip to the current active transform. | This button will add a horizontal flip to the current active transform. | ||
| + | |||
==Flip Vertical== | ==Flip Vertical== | ||
This button will add a vertical flip to the current active transform. | This button will add a vertical flip to the current active transform. | ||
| + | |||
==Rotate -45 Degrees== | ==Rotate -45 Degrees== | ||
This button will add a counter-clockwise 45 degree rotation to the current active transform. | This button will add a counter-clockwise 45 degree rotation to the current active transform. | ||
| + | |||
==Rotate +45 Degrees== | ==Rotate +45 Degrees== | ||
| Line 272: | Line 320: | ||
The following to modes are provided to perform selection: | The following to modes are provided to perform selection: | ||
| + | |||
==Freeform== | ==Freeform== | ||
Click and dragging the mouse cursor over the canvas view will produce a continues boundary for the new selection area. | Click and dragging the mouse cursor over the canvas view will produce a continues boundary for the new selection area. | ||
| + | |||
==Polygonal== | ==Polygonal== | ||
| Line 288: | Line 338: | ||
The magic wand selection tool will flood areas of the canvas selection where similar colours radiate from a selected seed point. The seed point of the magic wand selection is specified by clicking the mouse cursor on a point of the canvas view. The result of this tool can be controlled using the following settings: | The magic wand selection tool will flood areas of the canvas selection where similar colours radiate from a selected seed point. The seed point of the magic wand selection is specified by clicking the mouse cursor on a point of the canvas view. The result of this tool can be controlled using the following settings: | ||
| + | |||
==Tolerance== | ==Tolerance== | ||
The percentage level that controls the level of difference from the point selected on the current canvas layer that will be flooded with the tool. A value of 100% will flood all pixels in the current layer regardless of their difference from the seed point colour. A value of 0% will only allow pixels of the exact same value of the seed point to be flooded. | The percentage level that controls the level of difference from the point selected on the current canvas layer that will be flooded with the tool. A value of 100% will flood all pixels in the current layer regardless of their difference from the seed point colour. A value of 0% will only allow pixels of the exact same value of the seed point to be flooded. | ||
| + | |||
==Restrict to Canvas== | ==Restrict to Canvas== | ||
When selected the area that can be flooded by the fill bucket tool will be restricted to the canvas area. | When selected the area that can be flooded by the fill bucket tool will be restricted to the canvas area. | ||
| + | |||
==Restrict to Range== | ==Restrict to Range== | ||
When this option is selected then the area that can be flooded by the fill bucket tool will be constrained to the width and height values entered here centring around the seed point. | When this option is selected then the area that can be flooded by the fill bucket tool will be constrained to the width and height values entered here centring around the seed point. | ||
Revision as of 23:38, 14 June 2017
The 'Canvas Tools' palette provides the ability to select the current interactive tool active in the canvas workspace. The palette also makes available all the available settings to currently active canvas workspace tool.
To set the active canvas workspace select the corresponding tool icon button. The active canvas tool settings can be displayed or hidden by clicking the active canvas tool settings label below the canvas tool icon buttons.
The ability to quickly switch between different canvas tools is provided by custom Keyboard Shortcuts.
Hand Tool
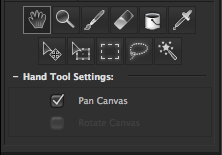
The hand tool provides ways to interactively navigate the canvas view.
Pan Canvas
When the pan canvas mode is selected the canvas can be quickly panned by pressing and dragging the mouse cursor in the canvas viewport area.
Zoom Tool
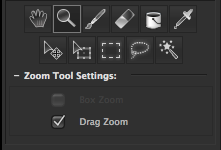
The zoom tool provides ways to interactively zoom the canvas view.
Drag Zoom
When the pan canvas mode is selected the canvas can be quickly zooms by pressing and dragging the mouse cursor in the canvas viewport area. The current centre of the canvas view will be retained as view is zoomed in and out.
Paint Brush Tool
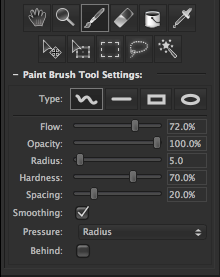
The paint brush tool provides an interactive tool to manipulate the pixel colours of areas of the current canvas layer. Circular stamps of the current tool colour will be produced at regular intervals on the current canvas layer based on the following settings:
Type
Four brush types are provides that produce different results when using the mouse to interact with the canvas view.
Freeform
Clicking and dragging the mouse cursor in the canvas view will produce brush stamps under the mouse cursor at regular intervals as it is moved.
Line
Clicking and dragging the mouse cursor between two points in the canvas view will produce a line comprising of brush stamps at regular intervals. A dashed line is provided during tool interaction to indicate where the output stamps will be produced. Holding the Shift key during tool interaction will snap the produced line to Horizontal or Vertical orientation.
Rectangle
Clicking and dragging the mouse cursor between two points in the canvas view will produce a rectangle comprising of brush stamps at regular intervals. A dashed line is provided during tool interaction to indicate where the output stamps will be produced. Holding the Shift key during tool interaction will snap the produced rectangle to be a square.
Oval
Clicking and dragging the mouse cursor between two points in the canvas view will produce an oval comprising of brush stamps at regular intervals. A dashed line is provided during tool interaction to indicate where the output stamps will be produced. Holding the Shift key during tool interaction will snap the produced rectangle to be a circle.
Flow
The flow level controls the transparency of each individual brush stamps. A flow level of 100% will provide a strong brush stroke, a lower flow level will provide a more natural fluid brush stroke.
Opacity
The opacity level controls transparency of the complete brush stroke. A opacity level lower than 100% provides maximum strength of the brush stroke, a lower opacity will not allow any element of a brush stoke to be above the specified opacity even if the same area is interacted with multiple times.
Radius
The radius control specifies the maximum radius of brush stamps in pixels. If a pressure sensitive input device is used and pressure sensitivity settings are active then the radius of brush stamps may be smaller than this specified radius.
Hardness
The hardness level controls the amount a brush stamp fades around it's edge. A hardness of 100% will mean no edge fading with happen. 0% hardness will produce a brush stamps opacity to fade from the completly way from centre to edge.
Spacing
The spacing level control specifies the spacing between brush stamps based on a brush stamps current radius. A level of 100% will cause no brush stamp overlapping, where as a low spacing level will cause brush to overlap more tightly.
Smoothing
When the freeform brush type is active this mode optional provides a smooth quadratic interpolation between the input cursors sample points.
Under normal operation this option is recommended to be active.
Pressure
If a pressure sensitive input device is being used such as a Wacom graphics tablet then these options allow the input pressure is dynamically affect the brush tool output. The following options are available:
Disabled
Even if a pressure sensitive input device is available the pressure input will be ignored.
Flow
The amount of pressure input is multiplies brush flow amount. The result is updated as each brush stamp is produced.
Radius
The amount of pressure input is multiplies brush radius amount. The result is updated as each brush stamp is produced.
Flow and Radius
Both the flow and radius amounts of the brush are both modified as specified above.
Behind
When this setting is active instead of the paint brush compositing pixel data on top of the current canvas layer the paint stroke will composited under the current layer data.
Eraser Brush Tool
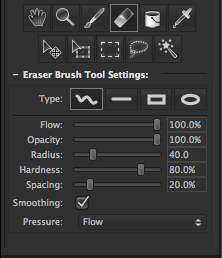
The eraser brush tool provides an interactive tool to manipulate the pixel transparency of areas of the current canvas layer. Circular stamps of reduced opacity will be produced at regular intervals on the current canvas layer based on the following settings:
Type
Four brush types are provides that produce different results when using the mouse to interact with the canvas view.
Freeform
Clicking and dragging the mouse cursor in the canvas view will produce brush stamps under the mouse cursor at regular intervals as it is moved.
Line
Clicking and dragging the mouse cursor between two points in the canvas view will produce a line comprising of brush stamps at regular intervals. A dashed line is provided during tool interaction to indicate where the output stamps will be produced. Holding the Shift key during tool interaction will snap the produced line to Horizontal or Vertical orientation.
Rectangle
Clicking and dragging the mouse cursor between two points in the canvas view will produce a rectangle comprising of brush stamps at regular intervals. A dashed line is provided during tool interaction to indicate where the output stamps will be produced. Holding the Shift key during tool interaction will snap the produced rectangle to be a square.
Oval
Clicking and dragging the mouse cursor between two points in the canvas view will produce an oval comprising of brush stamps at regular intervals. A dashed line is provided during tool interaction to indicate where the output stamps will be produced. Holding the Shift key during tool interaction will snap the produced rectangle to be a circle.
Flow
The flow level controls the transparency of each individual brush stamps. A flow level of 100% will provide a strong brush stroke, a lower flow level will provide a more natural fluid brush stroke.
Opacity
The opacity level controls transparency of the complete brush stroke. A opacity level lower than 100% provides maximum strength of the brush stroke, a lower opacity will not allow any element of a brush stoke to be above the specified opacity even if the same area is interacted with multiple times.
Radius
The radius control specifies the maximum radius of brush stamps in pixels. If a pressure sensitive input device is used and pressure sensitivity settings are active then the radius of brush stamps may be smaller than this specified radius.
Hardness
The hardness level controls the amount a brush stamp fades around it's edge. A hardness of 100% will mean no edge fading with happen. 0% hardness will produce a brush stamps opacity to fade from the completly way from centre to edge.
Spacing
The spacing level control specifies the spacing between brush stamps based on a brush stamps current radius. A level of 100% will cause no brush stamp overlapping, where as a low spacing level will cause brush to overlap more tightly.
Smoothing
When the freeform brush type is active this mode optional provides a smooth quadratic interpolation between the input cursors sample points.
Under normal operation this option is recommended to be active.
Pressure
If a pressure sensitive input device is being used such as a Wacom graphics tablet then these options allow the input pressure is dynamically affect the brush tool output. The following options are available:
Disabled
Even if a pressure sensitive input device is available the pressure input will be ignored.
Flow
The amount of pressure input is multiplies brush flow amount. The result is updated as each brush stamp is produced.
Radius
The amount of pressure input is multiplies brush radius amount. The result is updated as each brush stamp is produced.
Flow and Radius
Both the flow and radius amounts of the brush are both modified as specified above.
Fill Bucket Tool
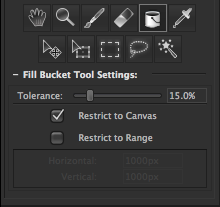
The fill bucket tool will flood areas of the current canvas layer of similar colours with the current canvas tool colour radiating from a selected seed point. The seed point of the colour fill is specified by clicking the mouse cursor on a point of the canvas view. The result of this tool can be controlled using the following settings:
Tolerance
The percentage level that controls the level of difference from the point selected on the current canvas layer that will be flooded with the tool. A value of 100% will flood all pixels in the current layer regardless of their difference from the seed point colour. A value of 0% will only allow pixels of the exact same value of the seed point to be flooded.
Restrict to Canvas
When selected the area that can be flooded by the fill bucket tool will be restricted to the canvas area.
Restrict to Range
When this option is selected then the area that can be flooded by the fill bucket tool will be constrained to the width and height values entered here centring around the seed point.
Eyedropper Tool
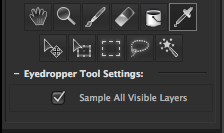
The eyedropper tool allows the user to select an existing colour in the current canvas view by clicking the mouse cursor to become the current canvas colour tool colour. How this colour is determined can be controlled using the following settings:
Sample All Visible Layers
If this setting is deactivated the pixel colour sampling will be restricted to current layer. When active the full composite of all the canvas layers will be used during colour sampling.
Move Tool
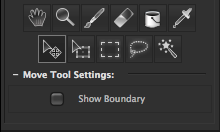
The move tool provides the facility to interactively move the currently selected layer(s), alternatively if a selection is active then the area the selection is covering of the currently selected layer will be moved. The amount of offset used for the move is determined by the distance the mouse cursor is clicked and dragged in the canvas view.
When the shift key is held down during tool interaction movement will be constrained to horizontal and vertical movement.
Show Boundary
If this setting is toggled active then a dashed box will encircle the boundary of the currently selected layer(s).
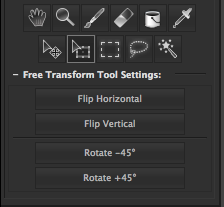
Free Transform Tool
The free transform tool provides the facility to interactively move, rotate and scale the currently selected layer(s), alternatively if a selection is active then the area the selection is covering the currently deleted layer will be transformed. A box bounding the currently selection area or selected layer(s) with handles at the corners and edge centres will be displayed.
To perform transforms the following methods can be used:
- Move: Click and drag the mouse cursor inside the bounding box in the canvas view. When the shift key is held movement will be constrained horizontally and vertically.
- Rotate: Click and drag the mouse cursor outside the bounding box in the canvas view.
- Scale: Click and drag the mouse cursor from any of the handles at the corners or edge centres of the bounding box. When the shift key is held and a corner handle is dragged the scale will be contained to the same amount in both width and height.
During interaction of the tool any transforms will be previewed using bilinear interpolation. When a transform operation is completed high quality bicubic interpolation is used.
To complete a transform operation the following methods can be used:
- Press enter key.
- Double click mouse cursor in the transform area bounding box.
- Switch to another canvas tool or perform another operation in PanelForge (a confirmation dialog box will be displayed to confirm the transform).
Flip Horizontal
This button will add a horizontal flip to the current active transform.
Flip Vertical
This button will add a vertical flip to the current active transform.
Rotate -45 Degrees
This button will add a counter-clockwise 45 degree rotation to the current active transform.
Rotate +45 Degrees
This button will add a clockwise 45 degree rotation to the current active transform.
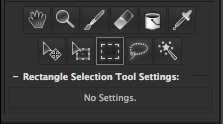
Rectangle Selection Tool
The rectangle tool provides functionality to quickly change the current canvas selection with rectangular areas. Click and dragging an area in canvas view will replace the current canvas selection with the specified rectangular area. Alternatively if the Shift key is held during tool interaction the specified rectangular area will be added to the current canvas selection, similarly the Alt (Mac: Option) key held will remove the specified rectangular area from current canvas selection.
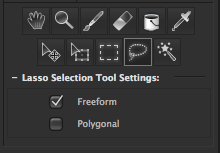
Lasso Selection Tool
The lasso tool provides functionality to interactively change the currently canvas selection quickly with arbitrary shapes. The default behaviour is to replace the current canvas selection alternatively if the Shift key is held during tool interaction the specified selection will be added to the current canvas selection, similarly the Alt (Mac: Option) key held will remove the specified selection from current canvas selection.
The following to modes are provided to perform selection:
Freeform
Click and dragging the mouse cursor over the canvas view will produce a continues boundary for the new selection area.
Polygonal
Clicking multiple points on the canvas view in sequence will produce a selection boundary constructed from straight lines connecting the points. To complete a selection double click the mouse cursor during the final point, alternatively press the enter key.
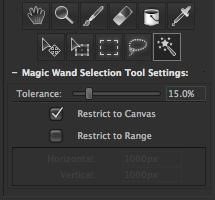
Magic Wand Selection Tool
The magic wand selection tool will flood areas of the canvas selection where similar colours radiate from a selected seed point. The seed point of the magic wand selection is specified by clicking the mouse cursor on a point of the canvas view. The result of this tool can be controlled using the following settings:
Tolerance
The percentage level that controls the level of difference from the point selected on the current canvas layer that will be flooded with the tool. A value of 100% will flood all pixels in the current layer regardless of their difference from the seed point colour. A value of 0% will only allow pixels of the exact same value of the seed point to be flooded.
Restrict to Canvas
When selected the area that can be flooded by the fill bucket tool will be restricted to the canvas area.
Restrict to Range
When this option is selected then the area that can be flooded by the fill bucket tool will be constrained to the width and height values entered here centring around the seed point.
